
How to Mould a Mouthguard at Home: A Fighter’s Guide to a Pro Fit
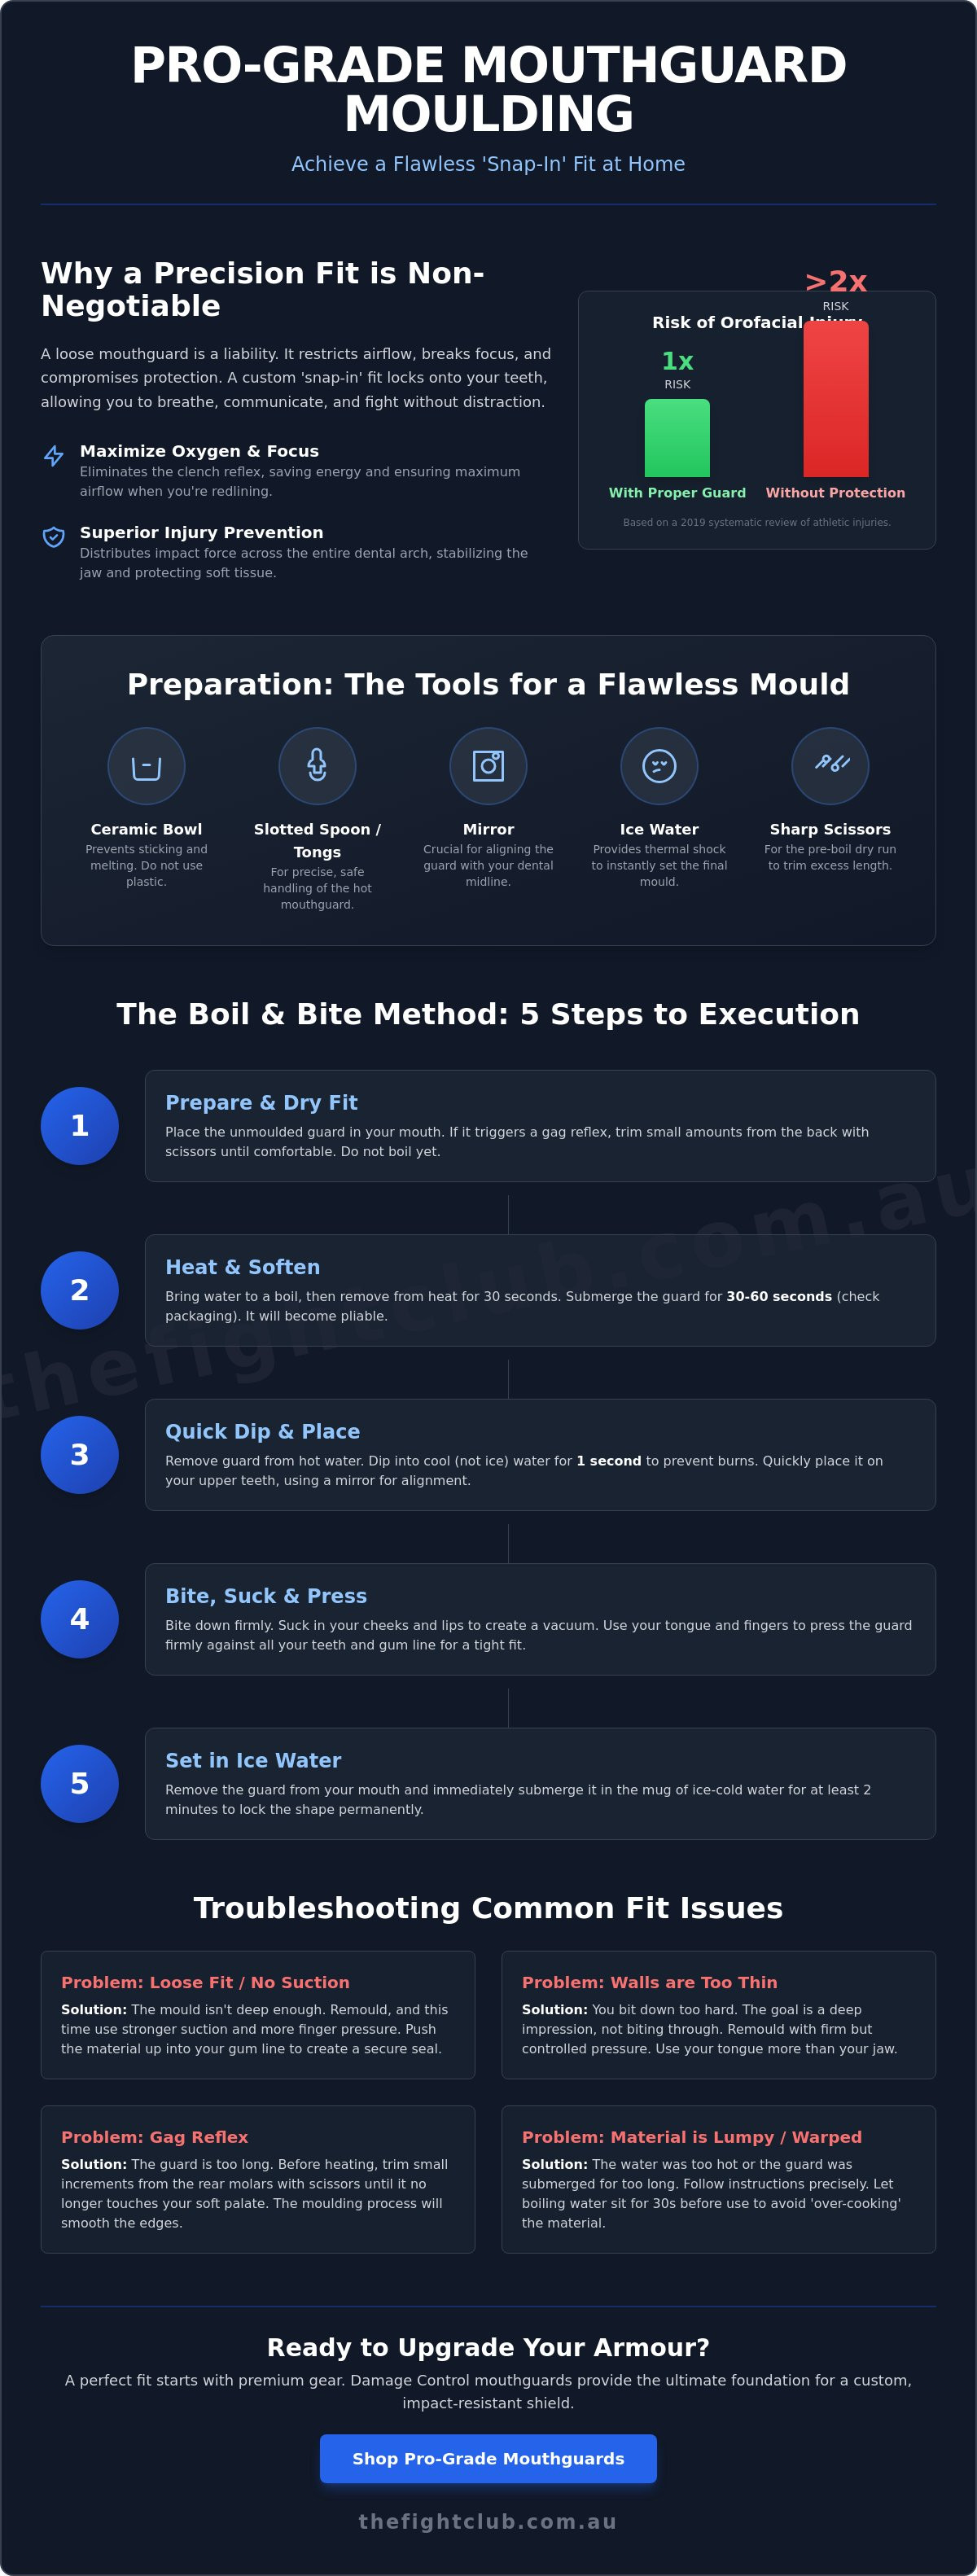
A mouthguard that falls out mid-round isn't protection; it's a liability. If you're constantly biting down just to keep your guard in place, you've already lost the focus needed for the fight. Learning how to mould a mouthguard at home is the difference between a loose piece of plastic and a professional-grade shield that stays put through every heavy exchange. A 2019 systematic review confirmed that athletes without proper protection face more than double the risk of orofacial injuries. Don't leave your teeth to chance.
We know the frustration. You've invested in high-quality gear and the fear of melting it into a useless lump is real. Settling for a poor fit means dealing with a bulky guard that triggers a gag reflex or blocks your breathing when the rounds get heavy. This guide eliminates the guesswork. You'll master the boil-and-bite technique to achieve a secure, 'snap-in' fit that allows you to speak clearly and breathe easily. We're breaking down the disciplined process of preparation, timing, and setting to ensure your gear performs as hard as you do.
Key Takeaways
- Understand why a 'snap-in' fit is the gold standard for maintaining oxygen flow and focus during high-intensity exchanges.
- Master the disciplined five-step process for how to mould a mouthguard at home to achieve a secure, professional-grade fit every time.
- Learn the technical 'quick dip' method to protect your gums from burns while the material is at its most pliable.
- Solve common fit issues like suction failure or thin material by adjusting your bite pressure and cooling technique.
- Discover why premium gear like Damage Control mouthguards provides the ultimate foundation for a custom, impact-resistant shield.
Why a Precision Fit Matters in the Heat of the Fight
A loose mouthguard is a liability. It's that simple. When the pace picks up and the sweat starts stinging your eyes, the last thing you need is a piece of plastic rattling against your palate. Protection is vital, but in the heat of a five-round war, oxygen is your primary currency. If your guard restricts your airway, you're fighting two opponents: the person in front of you and your own gear. Learning how to mould a mouthguard at home is the first step in ensuring your equipment works with you, not against you.
High-level combat athletes demand a 'snap-in' fit. This means the guard grips your upper teeth so securely that it stays in place even when your mouth is open. You need to be able to shout instructions to your corner or breathe deeply during heavy flurries without fear of losing your protection. A precision fit also plays a critical role in injury prevention by:
- Stabilising the jaw to prevent bone-on-bone impact.
- Distributing the force of a strike across the entire dental arch.
- Acting as a shock-absorbing buffer that can help mitigate the impact leading to concussions.
- Preventing soft tissue lacerations from your own teeth during a collision.
The Science of Shock Absorption
Most high-quality boil-and-bite guards utilise Ethylene-vinyl acetate (EVA). This material is chosen for its specific thermal properties; it becomes pliable at high temperatures, allowing it to take a detailed impression of your unique dental structure. When you look at different types of mouthguards, you realise that a well-moulded EVA guard is the most cost-effective way to achieve professional-grade safety. By distributing shock across your entire arch rather than a single point, the guard acts as a genuine crumple zone for your jaw. It turns a potential trip to the emergency room into a momentary reset.
Breathing and Performance
A poorly fitted guard forces a constant 'clench' reflex. You find yourself biting down throughout the round just to keep the guard from falling out. This unnecessary tension radiates through your jaw and neck, wasting precious energy and tightening your shoulders when they should be fluid. A custom-moulded fit eliminates this habit. It maximises airflow during high-intensity rounds, allowing for efficient gas exchange when your heart rate is redlining. There is also a massive psychological edge to consider. When you trust your armour, you can commit to your strikes and entries without hesitation. Knowing how to mould a mouthguard at home gives you that pro-level confidence without the elite price tag.
Preparation: The Tools for a Flawless Mould
Precision is non-negotiable. Before you even touch the kettle, you need to organise your station. A fighter's success is built on discipline; this process is no different. If you want to know how to mould a mouthguard at home like a pro, you start with the right kit. Skipping the prep leads to a botched fit and wasted money. Get your tools ready before the water hits the boil.
- Ceramic bowl: Plastic bowls are a liability. They can melt or cause the thermoplastic material to stick, ruining your guard before you've even bit down.
- Slotted spoon or tongs: You need precision handling. Dropping your guard into the bowl or fumbling with it in the hot water leads to uneven heating and potential burns.
- Mirror: Proper alignment with your dental midline is crucial for a 'snap-in' fit. You can't eyeball this.
- A mug of ice-cold water: This provides the thermal shock needed to 'set' the shape instantly once the moulding is complete.
- Sharp scissors: Essential for customising the length and removing excess material.
Testing the Length Before Boiling
Don't skip the dry run. Place the guard in your mouth while it's still hard. If the material reaches too far back and touches your soft palate, you'll gag mid-sparring. This is where you use your scissors. Trim small increments from the back molars. Once you're happy with the length, you'll eventually smooth the edges during the moulding phase. Sharp plastic against your gums is a distraction you don't need when the rounds get heavy. For high-quality gear that stands up to this level of customisation, check out the professional range at The Fight Club.
Temperature Control is Key
Boiling water is often too aggressive for the latest EVA materials. Bring your water to a boil, then take it off the heat for 30 seconds. This allows the temperature to stabilise. If you drop the guard into rolling water, you risk 'over-cooking' the material. This makes the walls collapse or become too thin to offer real protection. Keep your timer ready. Most guards require 30 to 60 seconds of immersion. This is the danger zone. Watch for the walls to begin to slightly flare. That's your cue. If you leave it too long, you'll end up with a melted mess rather than a piece of armour. Understanding these variables is central to learning how to mould a mouthguard at home effectively.
The Boil and Bite Method: 5 Steps to Execution
The transition from a loose plastic tray to a custom-fit shield happens in seconds. You've got your ceramic bowl ready and your water is off the boil. Now, you execute. Mastering how to mould a mouthguard at home is about timing and pressure. If you're too slow, the material hardens. If you're too aggressive, you bite through the protection. Follow these steps with the same focus you bring to a sparring session.
- Step 1: Submerge. Use your slotted spoon to lower the guard into the hot water. Watch for the walls to flare slightly. This usually takes 30 to 60 seconds.
- Step 2: The Quick Dip. Lift the guard and drop it into room-temperature water for exactly one second. This cools the surface enough to prevent gum burns without losing the internal heat needed for moulding.
- Step 3: Alignment. Use your mirror. Place the guard over your upper teeth, centring it perfectly with your midline.
- Step 4: Suck and Press. This is the critical phase where you create the vacuum seal.
- Step 5: The Ice Bath. Once the shape is set, drop it into your mug of ice-cold water. This locks the molecular structure of the EVA material instantly.
The 'Suck and Press' Technique
Suction is what separates a pro fit from a rookie mistake. Once the guard is in your mouth, use your tongue to push the material hard against the roof of your mouth. Simultaneously, use your fingers to press the outside walls firmly against your gums. Suck in as hard as you can. You are trying to remove every pocket of air to create a genuine vacuum seal. This ensures the guard stays up even when you open your mouth to breathe or shout instructions to your corner.
The Bite Down
While maintaining suction, bite down firmly. Do not bite through the material. Your goal is to create deep indentations for your lower teeth in the bottom grooves. This stabilises your jaw and prevents it from shifting during a heavy exchange. Align your lower jaw naturally. Hold this position for at least 45 seconds. Most generic guides suggest a few seconds, but a professional fit requires patience. Only after the material has cooled significantly in your mouth should you move it to the ice bath. Getting this right means your how to mould a mouthguard at home process results in armour that won't fail when the pressure is on.
Troubleshooting Your Fit: Avoiding Common Mistakes
Even the best fighters miss a block. If your first attempt at learning how to mould a mouthguard at home didn't result in a 'snap-in' fit, don't panic. You can fix most errors, provided you act quickly and understand where the technique broke down. A guard that doesn't stay up is a failure of execution, not the equipment. Address the issue now or pay for it in the ring.
If the guard falls down when you open your mouth, your suction was weak. You didn't pull the air out hard enough or press the material firmly against your gums. If the material feels paper-thin under your molars, you bit down with too much ego. The goal is a deep impression, not a bite-through. Gagging is a sign of poor preparation; it means the guard is still too long and is tickling your soft palate. If the fit is uneven, you didn't align the midline in the mirror. These aren't just annoyances; they are performance killers. If your current gear is beyond saving, it's time to invest in professional-grade mouthguards that offer better material memory.
Can You Remould a Mouthguard?
Most EVA-based guards allow for a second chance. We call this the 'Two-Strike' rule. You can re-submerge the guard in hot water to 'reset' the material and try again. However, every time you reheat the thermoplastic, the molecular structure degrades. The walls become less stable and the shock absorption properties diminish. If you can't get it right by the second attempt, cut your losses. A degraded guard offers a false sense of security that can lead to genuine injury.
Maintenance for Longevity
Your guard is a piece of medical equipment. Treat it with respect. Rinse it with cold water after every sparring session to remove saliva and debris. Never use hot water for cleaning, as this can warp the precision fit you worked hard to achieve. Store it in a dedicated antimicrobial case to prevent bacteria build-up. Hygiene is part of the discipline. Watch for warning signs like cracks, persistent odours, or thinning sections. The American Dental Association (ADA) suggests bringing your guard to checkups for evaluation. If you've taken a massive shot that altered the shape of the guard, replace it immediately. Protection is only effective if the structural integrity remains intact. Mastering how to mould a mouthguard at home includes knowing when your armour has reached the end of its life.
Upgrade Your Armour: Pro Gear from The Fight Club
Mastering the technical execution is only half the battle. You can follow every step of how to mould a mouthguard at home perfectly, but if the material is low-grade, your protection will still fall short. Authentic fighters don't settle for 'good enough' when their health is on the line. At The Fight Club, we stock gear that matches your intensity. Damage Control mouthguards represent the pinnacle of boil-and-bite technology, offering a level of customisation usually reserved for expensive dental impressions. This gear is built for the grind.
Damage Control vs. Standard Guards
Standard guards often feel like a bulky mouthful of rubber. They compromise your breathing and distract you from the fight. Damage Control uses extreme impact dispersion technology designed specifically for heavy hitters. These guards feature a dual-layer system that absorbs shock more effectively than single-layer stock options. For MMA and Muay Thai practitioners, this extra layer acts as a genuine crumple zone for your jaw. The low-profile design ensures you can breathe and communicate clearly during high-intensity flurries. It’s about maintaining your gas tank while staying protected. Check out our full range of mouth guards to find the right shield for your discipline. You need armour that stays in place when the rounds get heavy.
Complete Your Kit
Authentic training requires a complete approach to safety. Pairing your dental protection with elite boxing gloves ensures your entire body is shielded from unnecessary damage. We carry top-tier brands like Venum and Hayabusa because we believe in gear that lasts through years of hard rounds. This isn't about vanity; it's about longevity in the sport you love. A humble, ego-free fighter knows that respecting the craft means respecting the tools of the trade. We provide the equipment, but you provide the effort. We offer fast shipping across Australia so you can get back to the mats without delay. Whether you are prepping for your first spar or your tenth pro fight, your journey is about consistent progress. We provide the armour to keep you moving forward. Learning how to mould a mouthguard at home is just the start of your professional preparation.
Lock in Your Protection and Focus on the Fight
A professional fit is the result of discipline and technical execution. By mastering how to mould a mouthguard at home, you have removed a major distraction from your training. You now have a shield that stays in place; this allows you to breathe and absorb impact without hesitation. High-quality EVA and dual-layer technology provide the structural integrity needed for the most intense sparring sessions. Settling for anything less is a risk you don't need to take.
We are Australian owned and operated, stocking premium brands like Damage Control and Venum for the humble, ego-free athlete. Our fast national shipping ensures you are never out of the game for long. Respect the craft by investing in gear that matches your work ethic. Your longevity in the sport depends on the choices you make before the bell rings.
Secure your smile with pro-grade Mouthguards starting from $25
Get your gear sorted and get back to the mats. Stay focused, stay protected, and keep grinding.
Frequently Asked Questions
How long should I boil my mouthguard for the best fit?
Most guards require 30 to 60 seconds in water that has been taken off the boil. Check the manufacturer's instructions for the specific EVA material used in your gear. Watch for the walls to begin to flare slightly. This is the signal that the thermoplastic is ready for moulding. Don't overcook it or the material will become too thin to protect your teeth during a heavy exchange.
Can I mould a mouthguard if I have braces?
You can mould a mouthguard with braces, but you must use a barrier like dental wax to prevent the hot plastic from bonding to your brackets. Standard boil-and-bite guards can get stuck in the hardware. It's often better to invest in a specific braces-compatible guard that allows for tooth movement. If you choose to do it, don't suck in too hard or you'll wrap the material around the wires.
What do I do if my mouthguard is making me gag?
Trim the back edges of the guard if it's triggering your gag reflex. The material should not extend past your second molar or touch your soft palate. Use sharp scissors to remove small increments from the rear. Once you've trimmed it, you'll need to know how to mould a mouthguard at home again to smooth out the new edges. A shorter guard is better than one that makes you choke mid-round.
Is it possible to remould a mouthguard I've already used?
You can remould a used guard, but the 'Two-Strike' rule mentioned earlier applies. Reheating the material more than twice degrades the structural integrity and shock absorption. If the fit has become loose over time, try one re-boil. If it still doesn't 'snap-in' to place, the molecular structure is likely shot. Understanding how to mould a mouthguard at home properly the first time prevents this degradation. Trash it and start fresh to ensure your jaw remains protected.
How do I know if my mouthguard is fitted correctly?
A correctly fitted guard has a 'snap-in' feel and stays against your upper teeth without you biting down. You should be able to open your mouth, breathe, and speak clearly without it falling. If you have to constantly clench your jaw to keep it in place, the mould has failed. A pro fit feels like a part of your body, not a bulky obstacle in your mouth.
Should I trim my mouthguard before or after boiling it?
Trim the guard for length before you boil it. Perform a dry run to check if it hits your soft palate. Trimming while the material is hard allows for cleaner, more precise cuts with scissors. If you find rough edges after the moulding process, you can do a very brief dip in hot water to soften and smooth them with your thumb. Precision prep prevents gum irritation during long training sessions.
How often should I replace my combat sports mouthguard?
Replace your guard every 6 to 12 months or immediately after a significant impact that alters its shape. Over time, biting and clenching thin out the material, reducing its ability to disperse force. Bacteria also build up in the microscopic pores of the plastic. If you see cracks, notice a lingering odour, or feel the fit loosening, your armour is compromised. Don't wait for a broken tooth to tell you it's time for a replacement.
Can I use a sports mouthguard as a night guard for grinding?
Don't use a combat sports mouthguard for night grinding. Sports guards are designed for impact absorption and are often too bulky for sleep. Constant grinding will chew through the soft EVA material of a sports guard quickly. Night guards are made from much harder, thinner acrylics designed to withstand hours of friction. Using the wrong tool for the job will ruin your guard and won't protect your teeth from the pressure of bruxism.